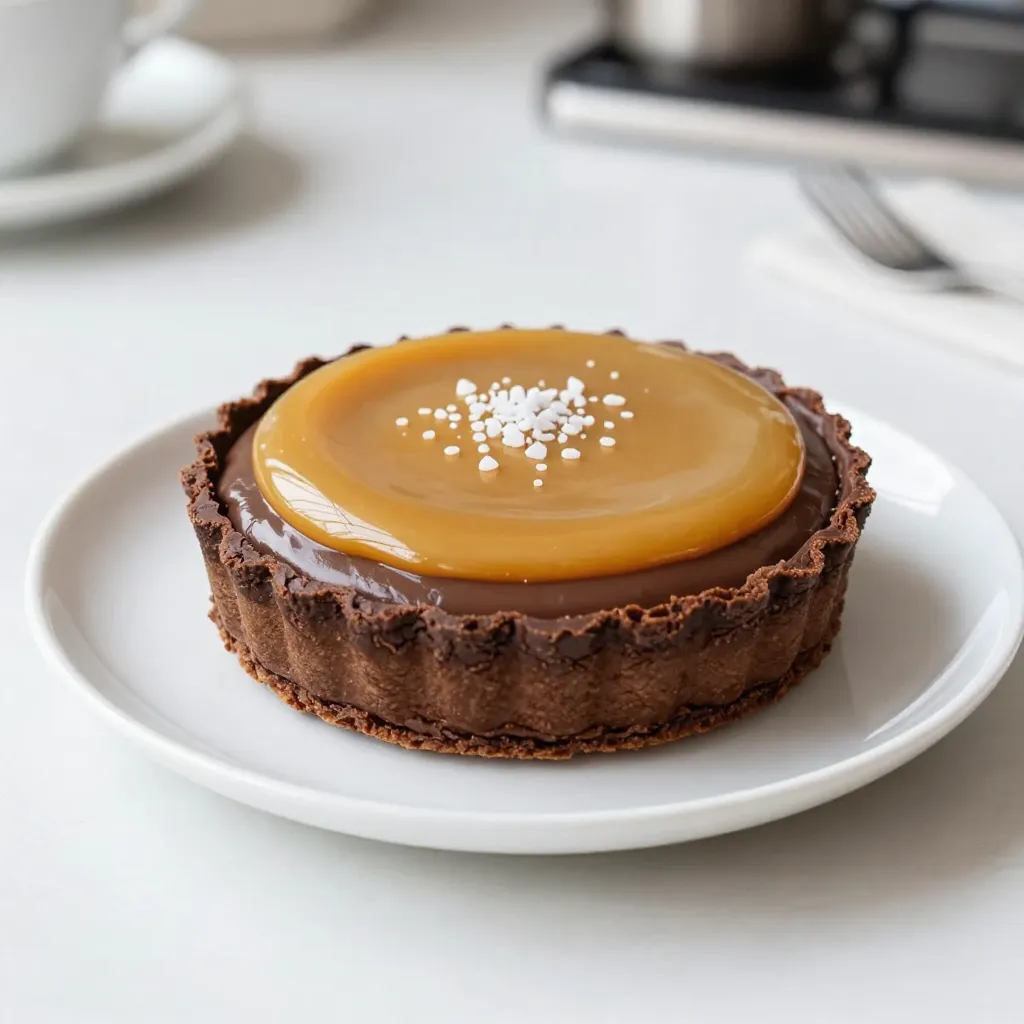
Welcome to a sweet journey! Today, we’re whipping up a Salted Caramel Chocolate Tart, a dessert that pairs rich chocolate with sweet, salty caramel in a tasty shell. This recipe is easy to follow and perfect for all skill levels. I’ll guide you step by step, sharing tips to make your tart a hit at any gathering. Let’s dive in and create a dessert everyone will love!
Why I Love This Recipe
- Decadent Layers: This tart combines a rich chocolate layer with a luscious salted caramel, creating a luxurious dessert that’s hard to resist.
- Perfect Balance: The sweetness of the caramel perfectly complements the bittersweet chocolate, making each bite a harmonious blend of flavors.
- Impressive Presentation: Serve it chilled with a sprinkle of sea salt on top for a sophisticated look that will wow your guests.
- Make Ahead Option: This tart can be made in advance, making it an excellent choice for parties or special occasions.
Ingredients
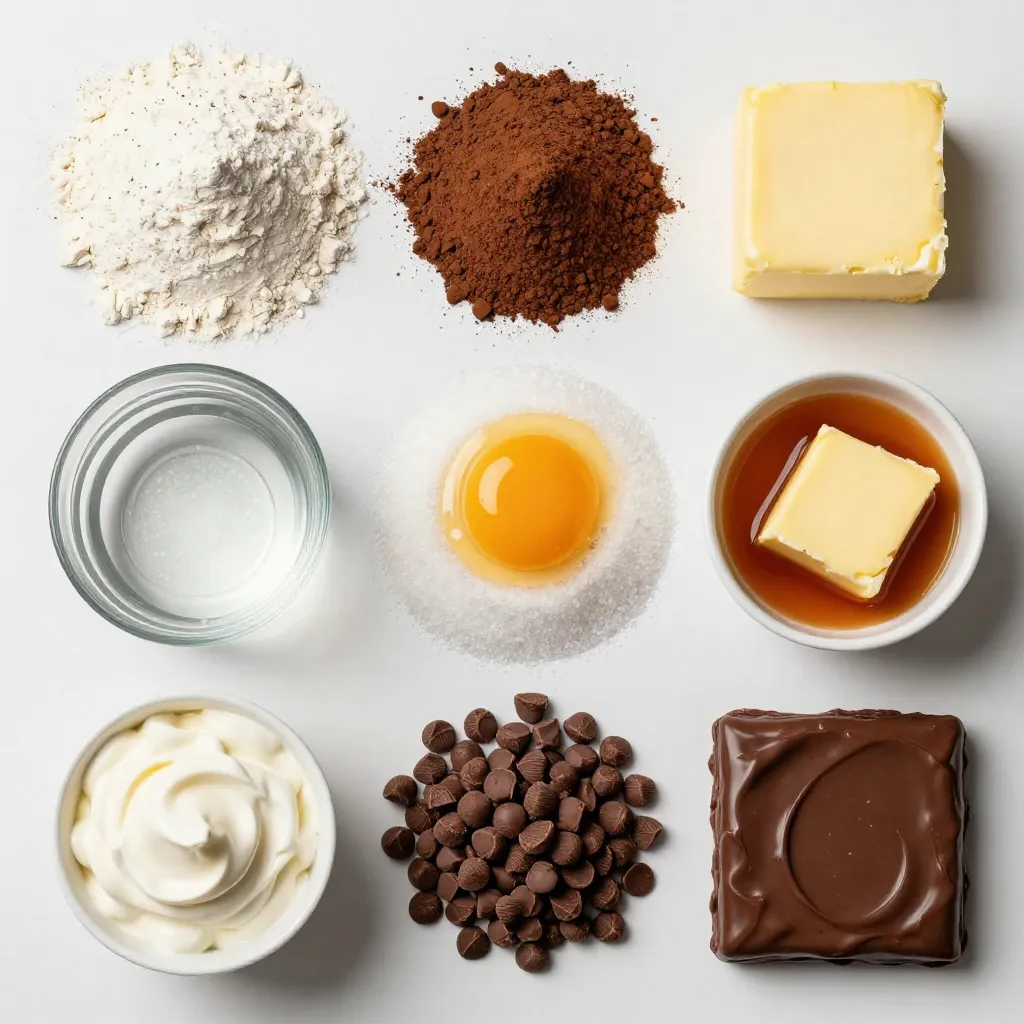
List of Ingredients
– Tart Crust Ingredients
– 1 ½ cups all-purpose flour
– ½ cup unsweetened cocoa powder
– ½ cup unsalted butter, softened
– ¼ cup granulated sugar
– 1 large egg yolk
– 1 tablespoon cold water
– Salted Caramel Ingredients
– 1 cup granulated sugar (for caramel)
– 6 tablespoons unsalted butter (for caramel)
– ½ cup heavy cream
– 1 teaspoon sea salt
– Chocolate Layer Ingredients
– 1 cup semi-sweet chocolate chips
– 2 tablespoons unsalted butter (for chocolate layer)
Each ingredient plays a key role in the taste and texture of the tart. The flour and cocoa powder form a rich crust. The butter adds smoothness, while the sugar sweetens it just right. The egg yolk helps bind the dough, giving it a nice texture.
For the caramel, the granulated sugar transforms into a deep, golden color. The butter and cream create a luscious sauce, while the sea salt gives it that perfect salty touch.
The chocolate layer consists of chocolate chips and butter that melt together. This mix creates a creamy layer that pairs beautifully with the caramel.
You can feel confident using these ingredients. They come together to create a dessert that is truly special. Enjoy the process of making this wonderful tart!
Step-by-Step Instructions
Preparing the Tart Crust
1. Combine the Dough: Start by adding 1 ½ cups all-purpose flour, ½ cup cocoa powder, ½ cup softened unsalted butter, and ¼ cup granulated sugar to a food processor. Pulse it until it looks like wet sand.
2. Form the Dough: Add 1 large egg yolk and 1 tablespoon cold water. Pulse again until the dough comes together. Shape it into a disk. Wrap it in plastic and chill for 30 minutes.
3. Roll the Dough: Preheat your oven to 350°F (175°C). On a floured surface, roll the dough to about ¼ inch thick. Fit it into a 9-inch tart pan, pressing it into the edges. Trim any extra dough.
4. Bake the Shell: Prick the bottom with a fork to avoid bubbles. Chill the crust for 15 more minutes. Bake for 15 minutes and let it cool completely on a wire rack.
Making the Salted Caramel
1. Create the Caramel: In a medium saucepan, add 1 cup granulated sugar over medium heat. Stir constantly until it melts into a rich golden color.
2. Add the Butter: Carefully mix in 6 tablespoons unsalted butter. Stir until it’s all melted.
3. Whisk in the Cream: Gradually add ½ cup heavy cream while whisking until smooth. Finally, stir in 1 teaspoon sea salt and set aside to cool.
Preparing the Chocolate Layer
1. Melt the Chocolate: In a heatproof bowl, combine 1 cup semi-sweet chocolate chips with 2 tablespoons unsalted butter.
2. Achieve Smoothness: Microwave in 30-second intervals, stirring until fully melted and smooth.
Assembling the Tart
1. Pour the Chocolate: Spread the melted chocolate evenly into the cooled tart shell. Let it set at room temperature for about 10 minutes.
2. Add the Caramel: Pour the cooled salted caramel over the chocolate layer. Spread it evenly to cover the chocolate completely.
Chilling and Serving
1. Chill the Tart: Place the tart in the fridge for at least 2 hours. This helps the caramel firm up.
2. Serve with Style: Once set, slice the tart into wedges. For a great look, sprinkle a little sea salt on top before serving. Enjoy every bite!
Tips & Tricks
Perfecting the Tart Crust
To make your tart crust perfect, avoid these common mistakes:
– Overmixing: Mix just until combined. Too much mixing makes the crust tough.
– Not chilling the dough: Chilling helps the dough firm up. This keeps your crust from shrinking during baking.
– Ignoring the fork holes: Prick the bottom with a fork. This prevents bubbling and helps it bake evenly.
Tools to enhance your tart-making skills include:
– A food processor: This saves time and ensures even mixing.
– A rolling pin: Use a good rolling pin to get an even thickness.
– A tart pan with a removable bottom: This makes serving easy and keeps your tart intact.
Caramel Tips
Temperature control is key for caramel. Here’s how to get it right:
– Use medium heat: This helps the sugar dissolve slowly, reducing the chance of burning.
– Watch the color: Stop cooking when it turns a rich golden-brown. This means it’s ready.
If your caramel crystallizes, don’t worry! Here’s how to fix it:
– Add a splash of water: This can help dissolve the sugar back into the mixture.
– Stir gently: Do this while it heats up again. Avoid stirring too much to prevent more crystals from forming.
Chocolate Melting Techniques
For melting chocolate, follow these best practices:
– Use a heatproof bowl: This helps prevent overheating and burning.
– Microwave in 30-second intervals: Stir between each interval until smooth. This gives you better control over the melting process.
For variations, try these different types of chocolate:
– Dark chocolate: Adds a richer flavor to your tart.
– Milk chocolate: This makes it sweeter and creamier.
– White chocolate: Use it for a unique twist on flavor and presentation.
Pro Tips
- Chill the Dough: Chilling the dough not only makes it easier to handle but also helps prevent shrinking during baking.
- Watch the Caramel: Caramel can go from perfect to burnt very quickly. Keep a close eye on it and stir continuously for even cooking.
- Use Quality Chocolate: Opt for high-quality semi-sweet chocolate chips for the best flavor in your tart.
- Let it Set: For the best texture, allow the tart to chill completely in the refrigerator before serving to ensure the layers firm up nicely.
Variations
Flavor Tweaks
You can change the taste of your tart with a few simple tweaks. Try adding chopped nuts like pecans or hazelnuts. They add a nice crunch. You can also mix in flavors like vanilla or orange zest for a fresh twist. For chocolate, consider using dark chocolate or milk chocolate. Each type will bring its own unique flavor to the tart.
Dietary Adjustments
If you need a gluten-free tart, swap the all-purpose flour for almond flour or a gluten-free blend. These options work well and taste great. For a dairy-free version, use coconut cream instead of heavy cream. You can find dairy-free chocolate chips too, making the whole tart dairy-free.
Presentation Variations
To make your tart look stunning, consider garnishing with fresh fruit or chocolate shavings. A sprinkle of sea salt on top adds a nice touch. You can also serve it with a scoop of vanilla ice cream for a delightful contrast. Try cutting the tart into small bites for an elegant dessert platter.
Storage Info
Short-term Storage
To keep your salted caramel chocolate tart fresh, store it in the refrigerator. Place the tart in an airtight container. This will prevent it from absorbing other smells. You can also cover it with plastic wrap. Make sure it is tightly sealed to keep moisture in.
Long-term Storage
If you want to save the tart for later, freezing is a great option. Wrap the tart tightly in plastic wrap and then in aluminum foil. This protects it from freezer burn. You can freeze it for up to three months.
When it’s time to enjoy the tart again, thaw it in the fridge overnight. This helps maintain its texture and flavor. Avoid thawing it at room temperature to prevent a soggy crust.
Recommended Shelf Life
The salted caramel chocolate tart stays fresh for about five days in the fridge. After that, the texture may change. If you freeze the tart, it can last up to three months without losing taste. Enjoy your delicious creation, whether fresh or frozen!
FAQs
What is the best way to reheat the tart?
To reheat the tart, place it in a warm oven. Set the oven to 300°F. Heat for about 10 minutes. This keeps the crust crisp and the filling warm. Avoid using a microwave, as it can make the crust soggy.
Can I use different types of chocolate for the tart?
Yes, you can use different types of chocolate. Dark chocolate gives a rich taste. Milk chocolate adds sweetness. You can also mix chocolates for a unique flavor. Just make sure to adjust the sugar if needed.
Is it possible to make the caramel ahead of time?
Yes, you can make salted caramel ahead of time. Just store it in an airtight container. Keep it in the fridge for up to a week. When ready to use, gently warm it to a pourable state.
How do I prevent the crust from becoming soggy?
To keep the crust crisp, bake it fully before adding filling. Pricking the bottom with a fork helps too. You can also brush the baked crust with melted chocolate. This adds a barrier against moisture.
Can I substitute ingredients for dietary restrictions?
Absolutely! For a gluten-free option, use almond flour or gluten-free flour blends. To make it dairy-free, try coconut cream instead of heavy cream and use dairy-free chocolate. You can customize this tart to fit your needs.
This blog covered the key steps to make a salted caramel chocolate tart. We explored ingredients, from the tart crust to the rich chocolate layer. I shared tips for the perfect caramel and how to assemble the tart. You learned ways to tweak flavors and make dietary adjustments.
Remember, practice makes perfect. With these tips, you can impress your friends and family with your baking skills. Enjoy your delicious creation and feel proud of your wor