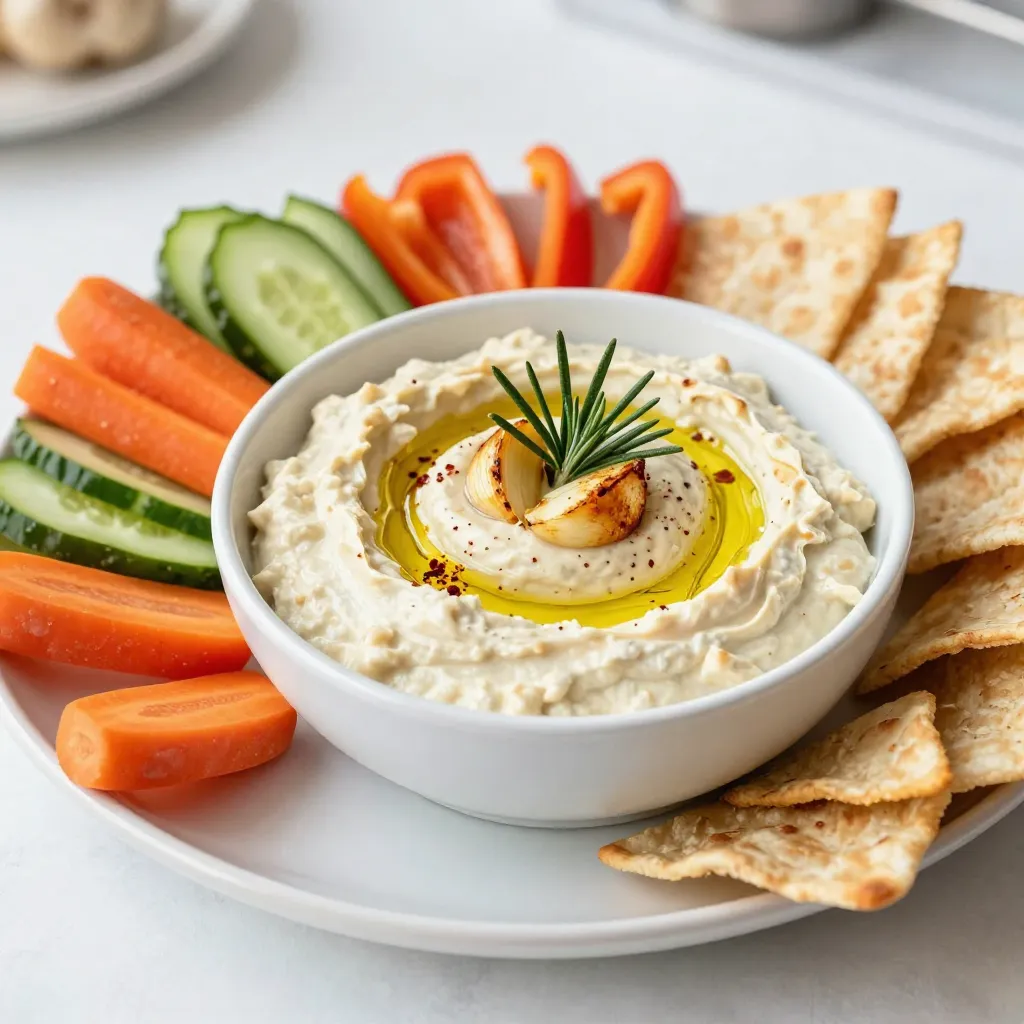
Looking for a tasty snack that’s both simple and healthy? This Roasted Garlic White Bean Dip is your answer! It combines creamy white beans, sweet roasted garlic, and fresh herbs for a flavor that’s out of this world. Perfect for any gathering, this dip is easy to make and delightful to serve. Let’s dive into the ingredients and get you started on this delicious journey!
Why I Love This Recipe
- Deliciously Creamy: This dip boasts a velvety texture that makes it irresistible, perfect for pairing with crunchy veggies and pita chips.
- Healthier Option: Made with white beans, this dip is packed with protein and fiber, making it a nutritious alternative to traditional dips.
- Customizable Flavor: With simple ingredients like garlic, lemon, and herbs, you can easily adjust the flavors to suit your taste preferences.
- Perfect for Any Occasion: This dip is an excellent choice for parties, picnics, or casual gatherings, bringing a touch of elegance to your appetizer spread.
Ingredients
Main Ingredients
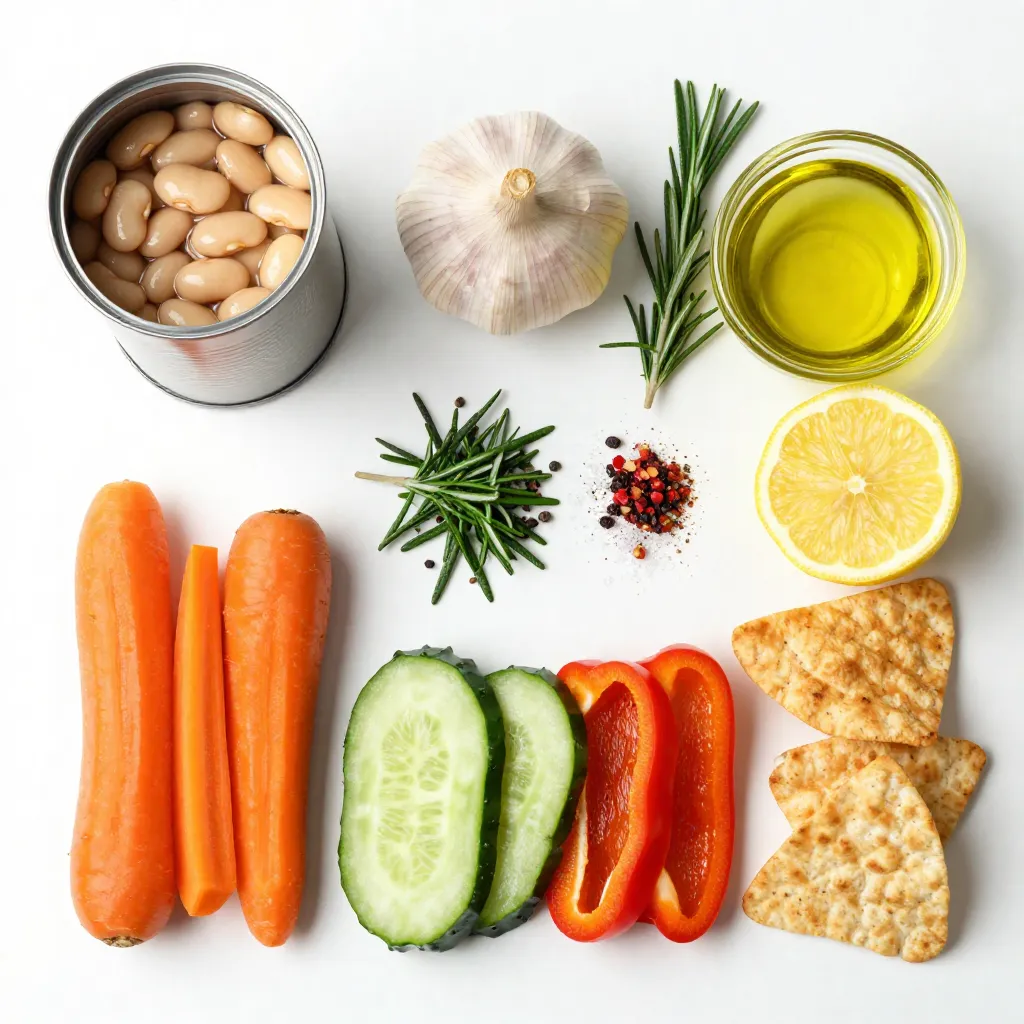
– 1 can (15 oz) white beans (cannellini or navy), thoroughly drained and rinsed
– 1 head of garlic
– 2-3 tablespoons extra virgin olive oil, plus extra for drizzling
– 1 tablespoon fresh lemon juice
Seasoning
– 1 teaspoon fresh rosemary, finely chopped
– Sea salt and freshly cracked black pepper, to taste
– Optional: a pinch of red pepper flakes for a touch of heat
Serving Suggestions
– Fresh vegetables (carrots, cucumbers, bell peppers)
– Pita chips
To make this dip, gather the ingredients above. White beans provide a creamy base. Roasting garlic adds a sweet, rich taste. Olive oil makes the dip smooth and shiny. Fresh lemon juice brightens the flavor.
Herbs like rosemary give a lovely aroma. Sea salt and black pepper enhance all the tastes. If you like heat, red pepper flakes add a nice kick.
For serving, colorful veggies like carrots, cucumbers, and bell peppers look great. Pita chips add crunch. This dip is simple yet satisfying for any gathering.
Step-by-Step Instructions
Preheat the Oven
First, set your oven to 400°F (200°C). This is the perfect temperature for roasting garlic. Make sure your oven is hot before you start. A well-preheated oven helps the garlic roast evenly and brings out its sweet flavor.
Roasting Garlic
To prepare the garlic, slice off the top of the head. This lets you see the cloves inside. Place the garlic on aluminum foil and drizzle it with 1-2 teaspoons of extra virgin olive oil. Wrap the garlic tightly in the foil. Roast it in the oven for about 30-35 minutes. You want the cloves to be soft and fragrant. The roasting time can vary, so check for tenderness.
Preparing the Dip Mixture
While the garlic roasts, grab your food processor. Add the drained white beans, fresh lemon juice, and chopped rosemary. Season with a pinch of sea salt and cracked black pepper. Pulse the mixture until it is somewhat combined. You want it to be a little chunky at first, but not too rough.
Finalizing the Dip
Once the garlic is done, let it cool a bit. Squeeze the soft cloves into the food processor. Add another tablespoon of olive oil for richness. Blend everything until smooth. If the dip is too thick, you can add a splash of water or more olive oil. Make sure to taste it! Adjust the seasoning with more salt, pepper, or lemon juice to suit your taste. When you’re happy with the flavor, transfer the dip to a bowl. Drizzle some olive oil on top for a lovely finish, and add red pepper flakes if you want some heat.
Tips & Tricks
Achieving the Perfect Texture
To make the dip smoother, start with drained white beans. Use a food processor for blending. After adding roasted garlic, blend well. If the dip feels thick, add a splash of water or more olive oil. Blend again until you get a creamy texture. This ensures it spreads easily on bread or veggies.
Flavor Adjustments
You can customize the dip with more flavors. Try adding fresh herbs like thyme or basil. A splash of balsamic vinegar can add a tangy twist. For a spicy kick, mix in red pepper flakes or cayenne pepper. Always taste your dip as you go. Adjust the seasoning until it’s just right for your taste.
Presentation Ideas
Serving is just as important as making the dip. Use a colorful bowl to showcase your dip. Drizzle a bit of olive oil on top for shine. Scatter fresh herbs or red pepper flakes on top for a pop of color. Serve with vibrant veggies like carrot sticks, cucumber slices, and bell pepper strips. Pita chips add a nice crunch, making your dish look inviting and fun!
Pro Tips
- Roast Garlic for Depth: Roasting garlic transforms its flavor, making it sweet and mellow, which enhances the dip’s overall taste.
- Texture Matters: For a creamier consistency, blend the dip longer and add a little extra olive oil or water as needed.
- Fresh Herbs Boost Flavor: Experiment with different herbs like thyme or basil to personalize the dip and elevate its flavor profile.
- Add a Zesty Kick: If you enjoy heat, include a touch of cayenne pepper or chopped jalapeños for an extra layer of flavor.
Variations
Adding Herbs or Spices
You can change the flavor of your dip by adding herbs or spices. Fresh herbs like basil or thyme work great. They add a nice twist to the dip. For a spicy kick, add a pinch of cayenne pepper. You can also try smoked paprika for a deeper flavor. Just mix in your chosen herbs or spices when you blend the dip.
Flavor Profiles
You can create sweet or savory versions of this dip. For a sweet taste, add roasted red peppers or a drizzle of honey. This gives a nice contrast to the creamy beans. On the other hand, if you prefer savory, stick with the garlic and herbs. You can also add a splash of balsamic vinegar for a tangy note. Experiment to find what you love best.
Alternative Base Ingredients
If you want to switch things up, try other beans or legumes. Black beans work well for a different taste. They add a rich, earthy flavor. Chickpeas are another option. They make a thicker dip and give a nutty taste. Just remember to adjust your seasonings based on the bean you choose.
Storage Info
Storing the Dip
To keep your roasted garlic white bean dip fresh, use an airtight container. Glass containers work best. Before sealing, let the dip cool to room temperature. This prevents moisture build-up. You can also wrap the container in plastic wrap for extra protection.
Reheating Instructions
When it’s time to enjoy your dip again, gently reheat it. Use a microwave or stovetop. If using a microwave, heat for 30 seconds at a time. Stir between intervals to ensure even warmth. If you use the stovetop, heat on low and stir often. Add a splash of olive oil or water if it’s too thick.
Shelf Life
In the fridge, your dip lasts about five days. Store it well to keep it tasty. If you notice any changes in smell or color, it’s best to toss it. Always check before enjoying leftovers to ensure it’s safe to eat.
FAQs
How can I make Roasted Garlic White Bean Dip vegan?
To make this dip vegan, keep it simple. The main ingredients are already plant-based. You just need to ensure that the olive oil is pure and free from animal products. You can also use fresh herbs like basil or thyme instead of rosemary if you prefer. If you want more flavor, add a splash of balsamic vinegar or a dash of smoked paprika. Both enhance the taste without adding any animal products.
Can I use dried beans instead of canned?
Yes, you can use dried beans! First, soak 1 cup of dried white beans overnight. This helps soften them. After soaking, drain the beans and put them in a pot with 3 cups of water. Bring the water to a boil, then lower the heat and simmer for about 1-1.5 hours until the beans are soft. Drain and rinse them before using in the dip. This gives you a fresh taste and lets you control the salt.
What can I serve with Roasted Garlic White Bean Dip?
This dip pairs well with many items. Here are some ideas:
– Sliced fresh veggies: carrots, cucumbers, and bell peppers add crunch.
– Pita chips: they are perfect for scooping up the dip.
– Crackers: choose whole grain or flavored varieties for extra taste.
– Toasted bread: serve on small slices for a more gourmet feel.
– Grilled shrimp or chicken: these can add a protein kick to your platter.
– Fresh herbs: garnish with parsley or dill for color and freshness.
Feel free to mix and match what you have on hand or what you enjoy!
This article covers how to make a tasty Roasted Garlic White Bean Dip. We went over the key ingredients, including white beans and roasted garlic, and easy steps to prepare it. I shared tips for perfect texture and ways to customize flavors. You learned how to store this dip properly and how to keep it fresh.
Enjoy making this dip and get creative with your serving ideas. You can impress friends and family with your new skill