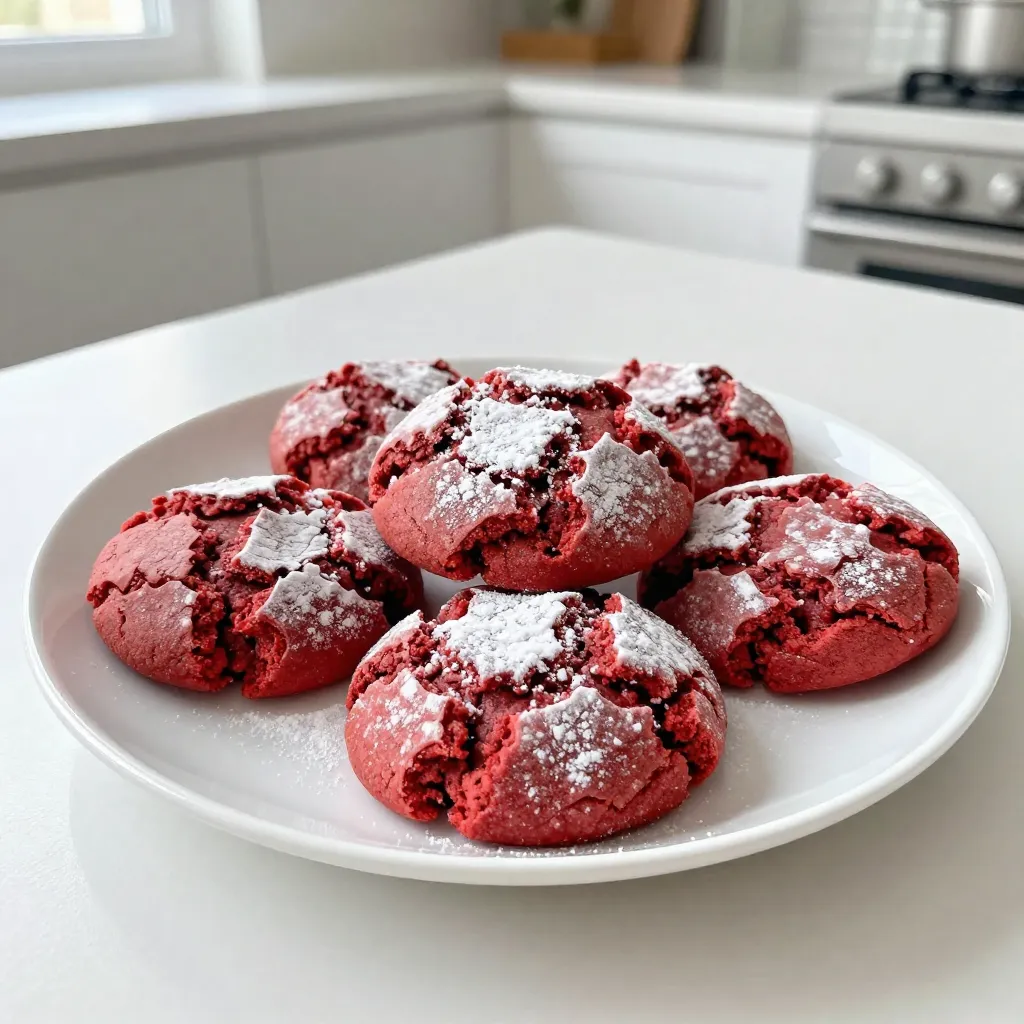
If you’re looking for a special treat that’s both easy and fun to make, your search ends here! Red Velvet Crinkle Cookies are a delightful twist on classic cookies, with their rich color and soft texture. In this guide, I’ll walk you through every step to create these eye-catching goodies. From choosing the best ingredients to mastering the perfect crinkle effect, you’ll impress everyone with your baking skills. Let’s dive in!
Why I Love This Recipe
- Beautiful Presentation: The striking red color and powdered sugar dusting make these cookies visually stunning, perfect for any occasion.
- Chewy Texture: The combination of soft centers and slightly crisp edges creates a delightful bite that cookie lovers crave.
- Easy to Make: This recipe has simple steps, making it accessible even for novice bakers to achieve delicious results.
- Perfect for Celebrations: These festive cookies add a touch of fun to any gathering, especially during holidays and special events.
Ingredients
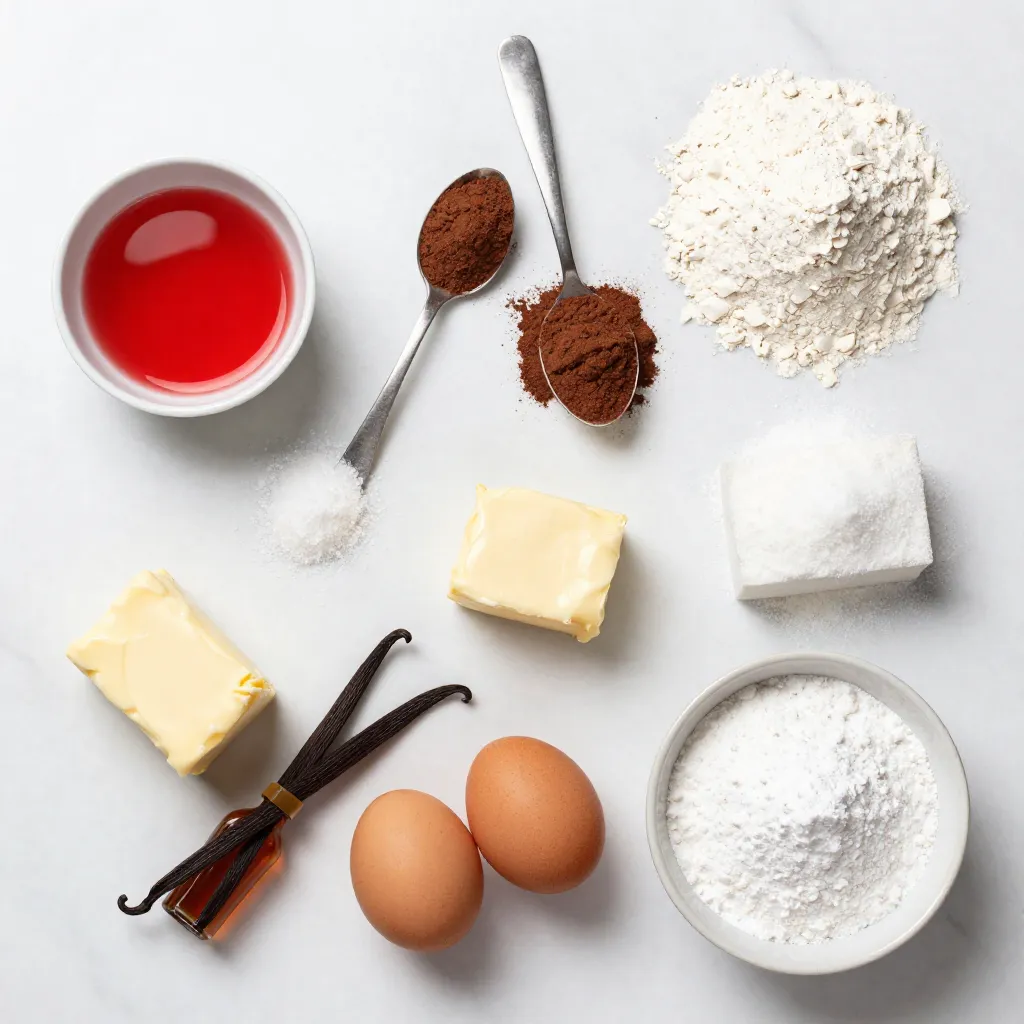
Ingredient List with Measurements
– 2 cups all-purpose flour
– 1 tablespoon cocoa powder
– 1 teaspoon baking powder
– ½ teaspoon baking soda
– ½ teaspoon salt
– ½ cup unsalted butter, softened
– 1 cup granulated sugar
– 1 large egg
– 1 tablespoon red food coloring (gel or liquid)
– 1 teaspoon vanilla extract
– Powdered sugar for dusting
Ingredient Tips for Best Results
Use unsalted butter to control the saltiness. Softened butter helps the sugar blend well. Creaming the butter and sugar for three minutes adds air, making the cookies fluffy. For the best color, choose gel food coloring over liquid. It gives a richer hue without adding extra moisture.
Substitutions and Alternatives
If you need a gluten-free option, swap the all-purpose flour for a gluten-free blend. You can also replace the egg with a flax egg—mix one tablespoon of flaxseed meal with two and a half tablespoons of water. For a twist, use dark chocolate cocoa powder instead of regular cocoa powder for a deeper flavor.
Step-by-Step Instructions
Prepping Your Workspace
Start by gathering all your ingredients and tools. You’ll need a mixing bowl, electric mixer, spatula, and baking sheet. Preheat your oven to 350°F (175°C). Line your baking sheet with parchment paper. This step helps cookies release easily after baking. A clean workspace keeps you organized and makes baking fun.
Mixing the Dough
In a medium bowl, whisk together these dry ingredients:
– 2 cups all-purpose flour
– 1 tablespoon cocoa powder
– 1 teaspoon baking powder
– ½ teaspoon baking soda
– ½ teaspoon salt
Set this mixture aside. In another large bowl, cream together ½ cup softened unsalted butter and 1 cup granulated sugar. Mix until light and fluffy. This takes about 3 minutes. Next, add 1 large egg, 1 tablespoon red food coloring, and 1 teaspoon vanilla extract. Beat until combined.
Gradually add the dry mixture to the wet mixture. Use a spatula or wooden spoon to mix gently. Stop when you no longer see dry flour. The dough should feel soft and slightly tacky.
Chilling and Baking Process
Cover the dough with plastic wrap. Chill it in the fridge for at least 30 minutes. Chilling helps the cookies keep their shape while baking. After chilling, scoop tablespoon-sized portions of dough. Roll them into smooth balls.
Next, roll each ball in powdered sugar until fully coated. This gives your cookies that beautiful crinkle effect. Place the sugared balls on the baking sheet, leaving about 2 inches between them. Bake for 10-12 minutes. Look for edges that are set and centers that are still soft.
Once baked, let the cookies cool on the sheet for 5 minutes. Then, transfer them to a wire rack to cool completely. Enjoy your colorful and tasty red velvet crinkle cookies!
Tips & Tricks
Achieving the Perfect Crinkle Effect
To get that lovely crinkle look, rolling the dough in powdered sugar is key. Make sure each ball is well coated. This sugar layer will crack as the cookies bake. The more powdered sugar you use, the better the crinkles will show. You can sprinkle on extra sugar after baking for a festive touch.
Common Mistakes to Avoid
One common mistake is skipping the chilling step. Chilling the dough helps cookies keep their shape. If you skip this, your cookies may spread too much and lose that nice round shape. Another mistake is overmixing the dough. Mix just until the flour disappears. This keeps your cookies soft. Lastly, make sure your oven is at the right temperature. An oven that is too hot can burn the edges.
Baking and Cooling Tips
Baking times may vary based on your oven. Start checking your cookies around 10 minutes. Look for slightly soft centers and set edges. After baking, let the cookies cool on the sheet for 5 minutes. This helps them firm up. Then, move them to a wire rack to cool fully. This final step keeps cookies from getting soggy. Enjoy the process, and soon you’ll have stunning red velvet crinkle cookies to share!
Pro Tips
- Chill the Dough: Refrigerating the cookie dough for at least 30 minutes helps maintain the shape of the cookies during baking, resulting in a perfect crinkle effect.
- Use Gel Food Coloring: For a more vibrant red color, opt for gel food coloring instead of liquid. It will not alter the texture of the dough.
- Don’t Overbake: To achieve a chewy center, remove the cookies from the oven when the edges are set but the center remains slightly soft. They will continue to cook as they cool.
- Dust Generously: Coat the dough balls well with powdered sugar before baking. This not only enhances the appearance but also contributes to the crinkle effect.
Variations
Flavor Additions and Mix-ins
You can easily change the flavor of your red velvet crinkle cookies. Here are some fun ideas:
– Chocolate Chips: Add a cup of mini chocolate chips for a sweet twist.
– Nuts: Chopped walnuts or pecans can add a nice crunch.
– Cinnamon: A pinch of cinnamon gives a warm flavor that pairs well with red velvet.
– Orange Zest: For a fresh touch, add some orange zest to the dough.
These little changes can make each batch unique and fun.
Red Velvet Crinkle Cookies with Cream Cheese
What goes better with red velvet than cream cheese? To make a cream cheese version:
– Cream Cheese Center: Make small balls of cream cheese and freeze them. Wrap cookie dough around each ball before baking.
– Cream Cheese Frosting: After baking, top each cookie with a dollop of cream cheese frosting. This adds a rich and tangy flavor.
This will take your cookies to a whole new level of yum!
Gluten-Free Version
You can make red velvet crinkle cookies gluten-free with a few simple swaps:
– Gluten-Free Flour: Use a gluten-free all-purpose flour blend instead of regular flour. Make sure it has xanthan gum for better texture.
– Adjustments: Sometimes, gluten-free flour needs a bit more liquid. Add a touch more butter or a splash of milk if the dough seems too dry.
These adjustments will help you enjoy these delightful cookies without any gluten!
Storage Info
How to Store Cookies
Store your red velvet crinkle cookies in an airtight container. This keeps them soft and fresh. If you stack the cookies, place parchment paper between layers. This prevents them from sticking together. Keep the container at room temperature for up to one week.
Freezing Instructions
You can freeze these cookies for later. First, let them cool completely. Place them in a single layer on a baking sheet. Freeze for about one hour until firm. Then, transfer cookies into a freezer-safe bag or container. They stay good for three months in the freezer. When you’re ready to enjoy them, let them thaw at room temperature.
Best Practices for Freshness
To keep your cookies fresh, avoid exposing them to air. Make sure your hands are clean when handling the cookies. This prevents contamination. You can also add a slice of bread to the container. The bread helps keep the cookies moist. Enjoy your delicious cookies at their best!
FAQs
What makes red velvet crinkle cookies different from regular cookies?
Red velvet crinkle cookies have a unique flavor and look. The cocoa powder adds a rich taste, while the red food coloring gives them their signature color. The crinkle effect comes from rolling the dough in powdered sugar before baking. This sugar creates a beautiful contrast when baked, making them stand out from regular cookies.
Can I use different food coloring?
Yes, you can use different food coloring. If you want to change the color, feel free to use blue, green, or even purple. Gel food coloring works best because it gives a vibrant color without adding too much liquid. Just remember that the flavor may change slightly based on the color you choose.
How do I know when the cookies are done baking?
To tell if the cookies are done, look at the edges. They should be set and firm. The centers may look soft, which is good. This helps keep the cookies chewy. If you gently press the center and it springs back, they are ready. Let them cool a bit on the baking sheet before moving them to a wire rack.
We covered the key steps for making perfect red velvet crinkle cookies. You learned about the right ingredients, how to mix and bake, and tips for the best results. Remember to avoid common mistakes and try different flavors. Store your cookies properly for lasting freshness. With practice, you can master this recipe and impress your family and friends. Enjoy the fun of baking and make these tasty treats your ow