Get ready to indulge in a sweet delight with Chocolate Mint Oreo Truffles! These dreamy, no-bake treats blend the classic taste of Oreos with a minty kick. You’ll love how easy they are to make. With just a few simple ingredients like cream cheese and peppermint extract, you can whip up these truffles in no time. Let’s dive into this delicious recipe that will impress your friends and satisfy your sweet tooth!
Why I Love This Recipe
- Easy to Make: This recipe requires minimal ingredients and straightforward steps, making it perfect for both novice and experienced bakers.
- Delicious Flavor Combination: The rich chocolate and refreshing mint create a delightful balance that is sure to impress anyone who tries them.
- Perfect for Any Occasion: Whether it’s a holiday party, birthday celebration, or just a sweet treat for yourself, these truffles fit right in.
- Customizable: You can easily adjust the flavors, colors, and toppings to suit your preferences or the theme of your event.
Ingredients
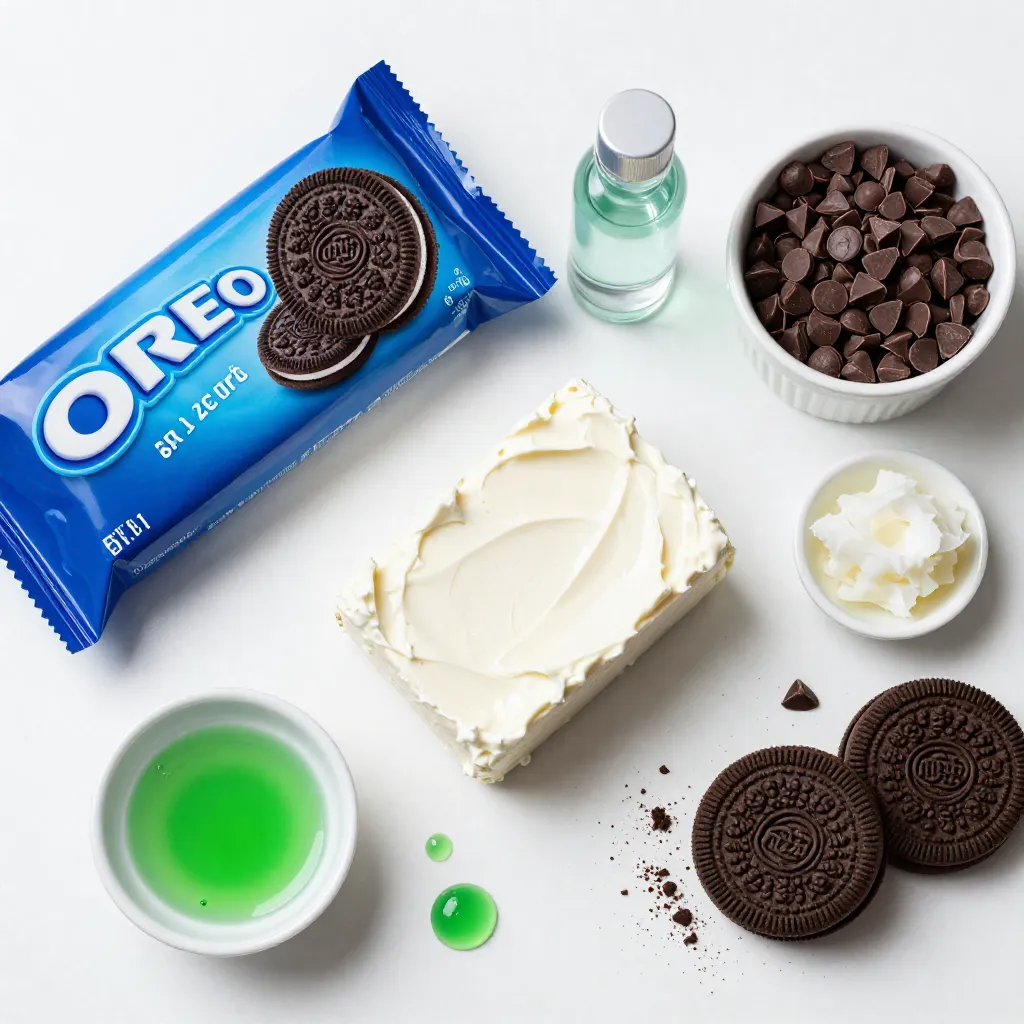
Main Ingredients
– 1 package (15.25 oz) Oreo cookies
– 8 oz cream cheese, softened to room temperature
– 1 teaspoon peppermint extract
Optional Ingredients
– 1 cup semi-sweet chocolate chips
– 1 tablespoon coconut oil (optional, enhances melting)
– ½ teaspoon green food coloring (optional, for aesthetic appeal)
– Mint sprinkles or crushed Oreos for garnish
To make these Chocolate Mint Oreo Truffles, you need just a few simple ingredients. First, the star of the show is the Oreo cookies. They provide a rich, chocolatey base. The cream cheese adds a smooth and rich texture. It helps bind the cookies together, making a delicious truffle mix. The peppermint extract brings that fresh flavor, making every bite delightful.
You can add optional ingredients to make them extra special. Semi-sweet chocolate chips are great for dipping. They give a sweet coating that pairs well with the minty filling. Coconut oil can help the chocolate melt smoothly, making it easier to dip. If you want to make your truffles pop, add a few drops of green food coloring. This gives a fun look to your truffles. Finally, mint sprinkles or crushed Oreos on top add a nice touch. They make your truffles not just tasty but also pretty.
With these ingredients, you can create a treat that everyone will love. The mix of flavors is perfect for parties or a sweet snack at home.
Step-by-Step Instructions
Crushed Oreo Preparation
To start, you need to crush the Oreo cookies. You can use a food processor for this. Just add the cookies and pulse until you get fine crumbs. If you don’t have a food processor, that’s okay! You can put the cookies in a sturdy bag and crush them with a rolling pin. Make sure they are finely ground for the best texture.
Mixing the Truffle Base
Next, grab a large mixing bowl. Add your crushed Oreo crumbs, softened cream cheese, and peppermint extract. Mix these ingredients well. You can use a spatula or your hands to combine everything. The mix should look like dough. This mixture is the heart of your truffles.
Shaping and Chilling
Now it’s time to shape the truffles. Take small portions of the mix, about one inch wide, and roll them into balls. Place these on a baking sheet lined with parchment paper. This makes it easy to remove them later. Once you’ve shaped all the truffles, pop the baking sheet into the freezer for about 30 minutes. This step helps them firm up.
Melting the Chocolate
While your truffles chill, you can melt the chocolate. Place the semi-sweet chocolate chips in a microwave-safe bowl. Heat them in the microwave in 30-second intervals. Stir the chocolate after each interval until it’s smooth. If you want, you can add coconut oil to make the chocolate silkier for dipping.
Dipping and Garnishing
Once the truffles are firm, it’s time to dip them in chocolate. Use a fork to lift each truffle and dip it in the melted chocolate. Rotate it gently so it gets fully coated. Let any extra chocolate drip off back into the bowl. For a fun touch, you can add a drop of green food coloring to the leftover chocolate and swirl it for a marbled look. Drizzle this over the truffles and sprinkle with mint sprinkles or crushed Oreos.
Final Touches
Let the chocolate harden completely. You can leave them at room temperature or place them in the fridge for about 15 to 20 minutes to speed up the process. Once set, arrange the truffles on a nice platter or in small cupcake liners. They will look and taste amazing!
Tips & Tricks
Achieving Perfect Truffles
To make your truffles just right, focus on the mix’s consistency. You want it to feel like dough, not too dry or wet. After mixing the crushed Oreos, cream cheese, and peppermint extract, test a small amount. If it holds together, you’re good to go. If it’s too crumbly, add a bit more cream cheese. If it’s too sticky, add more Oreo crumbs. This balance is key for perfect truffles.
Chocolate Melting Tips
Melting chocolate can be tricky. To avoid seizing, use a microwave-safe bowl. Heat chocolate chips in 30-second intervals. Stir between each interval until smooth. If your chocolate gets thick, add a tablespoon of coconut oil. This will help keep it silky and easy to dip. Make sure no water touches the chocolate, as this can ruin the texture.
Creative Garnishing Ideas
Garnishing adds fun to your truffles. After dipping, try different toppings. Mint sprinkles give a festive look. Crushed Oreos add extra crunch. You can also drizzle some colored chocolate on top. For more flair, use edible glitter or chopped nuts. These small touches make your truffles stand out on any plate.
Pro Tips
- Chill the Dough: For easier handling, ensure the Oreo mixture is chilled before shaping into truffles. This helps maintain their form while rolling.
- Use High-Quality Chocolate: Opt for high-quality chocolate chips for melting. This will enhance the flavor and texture of your truffles.
- Experiment with Flavors: Feel free to switch up the peppermint extract with other flavors like almond or orange for a unique twist on your truffles.
- Decorative Touches: Get creative with your garnishes! Consider using crushed nuts or colored sprinkles to give your truffles a personalized touch.
Variations
Flavor Variations
You can mix things up by trying different extracts. Instead of peppermint extract, use vanilla or almond extract. These will change the taste and give your truffles a new twist. Vanilla brings a warm, sweet flavor, while almond adds a nutty touch. Experimenting with flavors keeps this treat fresh and fun!
Chocolate Options
Your choice of chocolate can also change the truffle’s taste. While I love using semi-sweet chocolate, white chocolate or dark chocolate works great too. White chocolate gives a creamy sweetness, and dark chocolate adds a rich, bold flavor. Try each type and see which one you like best!
Dietary Variations
If you need gluten-free options, use gluten-free Oreo cookies. They taste just as good! For a dairy-free version, swap the cream cheese with a dairy-free cream cheese. Look for brands made from cashews or almonds. This way, everyone can enjoy these tasty treats without worry!
Storage Info
Storage Guidelines
To keep your Chocolate Mint Oreo Truffles fresh, store them in an airtight container. This helps seal in the flavor and moisture. Place parchment paper between layers to avoid sticking. Store in a cool, dry place away from direct sunlight. If your kitchen is warm, consider refrigerating them.
Shelf Life
These truffles can last up to one week in the fridge. If stored properly, they remain delicious and enjoyable. After a week, they may lose some freshness but still taste good. Keep an eye on any changes in texture or smell.
Freezing Instructions
For longer storage, you can freeze the truffles. Place them in a single layer on a baking sheet and freeze for about an hour. Once firm, transfer them to a freezer-safe bag or container. They can last up to three months in the freezer. When ready to enjoy, let them thaw in the fridge overnight for the best texture.
FAQs
Can I use different types of cookies?
Yes, you can use other cookies for your truffles. Here are some tasty options:
– Mint Oreos for extra mint flavor.
– Regular Oreos for a classic taste.
– Chocolate wafer cookies for a rich chocolate base.
– Graham crackers for a lighter texture.
Experiment with flavors to find your favorite.
How do I fix a runny truffle mixture?
If your truffle mixture is too runny, try these tips:
– Add more crushed Oreo cookies to thicken it.
– Chill the mixture in the fridge for 15 minutes.
– If it remains runny, you might need more cream cheese.
Mix again and chill until it firms up.
What can I substitute for cream cheese?
If you want a dairy-free or vegan option, use:
– Vegan cream cheese for a similar taste.
– Silken tofu blended until smooth for a lighter option.
– Cashew cream made from soaked cashews.
These substitutes work well while keeping the truffles creamy.
You learned how to make Oreo truffles with simple steps and fun variations. From crushing Oreo cookies to melting chocolate, each step builds delicious treats. Remember to mix well and chill your truffles for the best results. You can also experiment with flavors and toppings to make them your own. Store them carefully to keep them fresh. Enjoy making and sharing this tasty dessert that everyone will lov