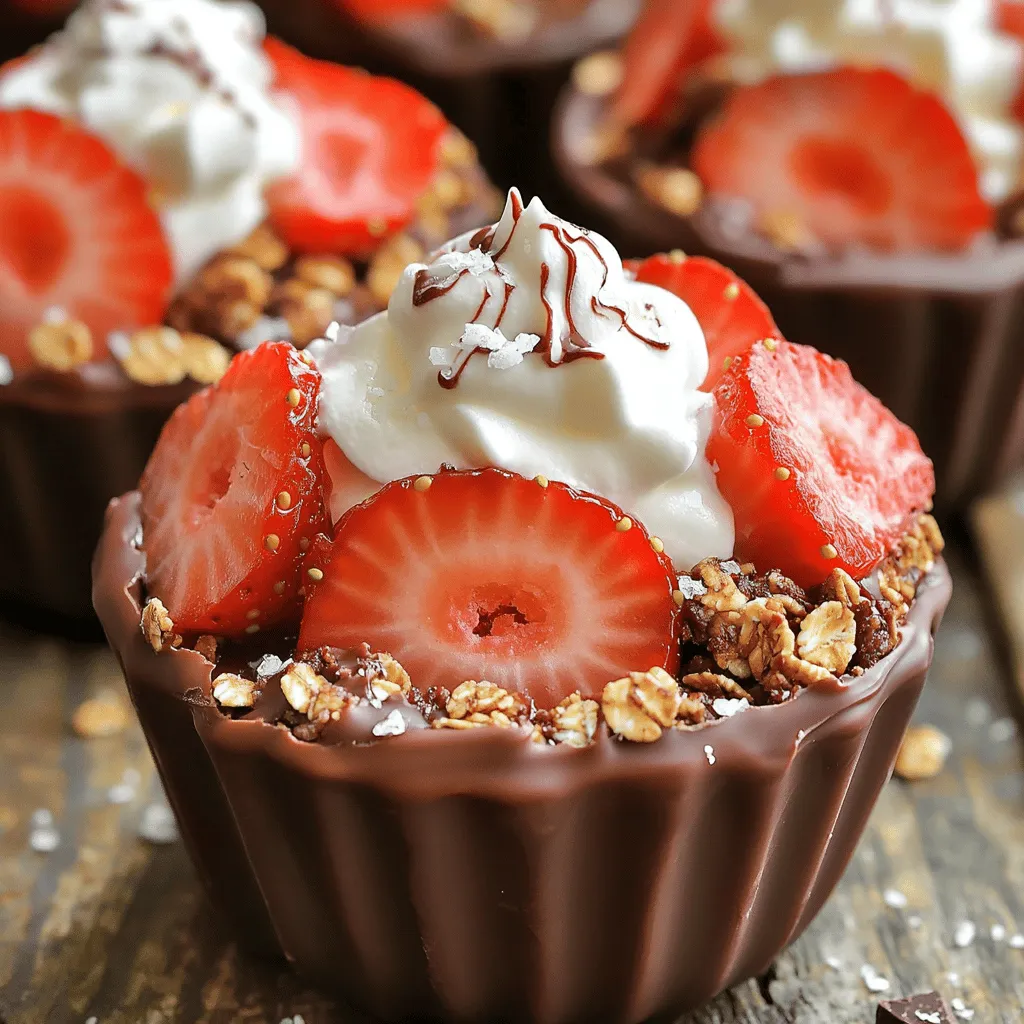
Ready to treat yourself to a sweet delight? My no-bake Chocolate Covered Strawberry Cups are the perfect quick dessert! With dark chocolate, fresh strawberries, and a crunchy layer of granola or graham crackers, these cups are simple, fun, and delicious. Plus, they require no baking skills! Let’s dive into this easy recipe and impress your friends and family with a dessert they won’t forget.
Ingredients
Main Ingredients
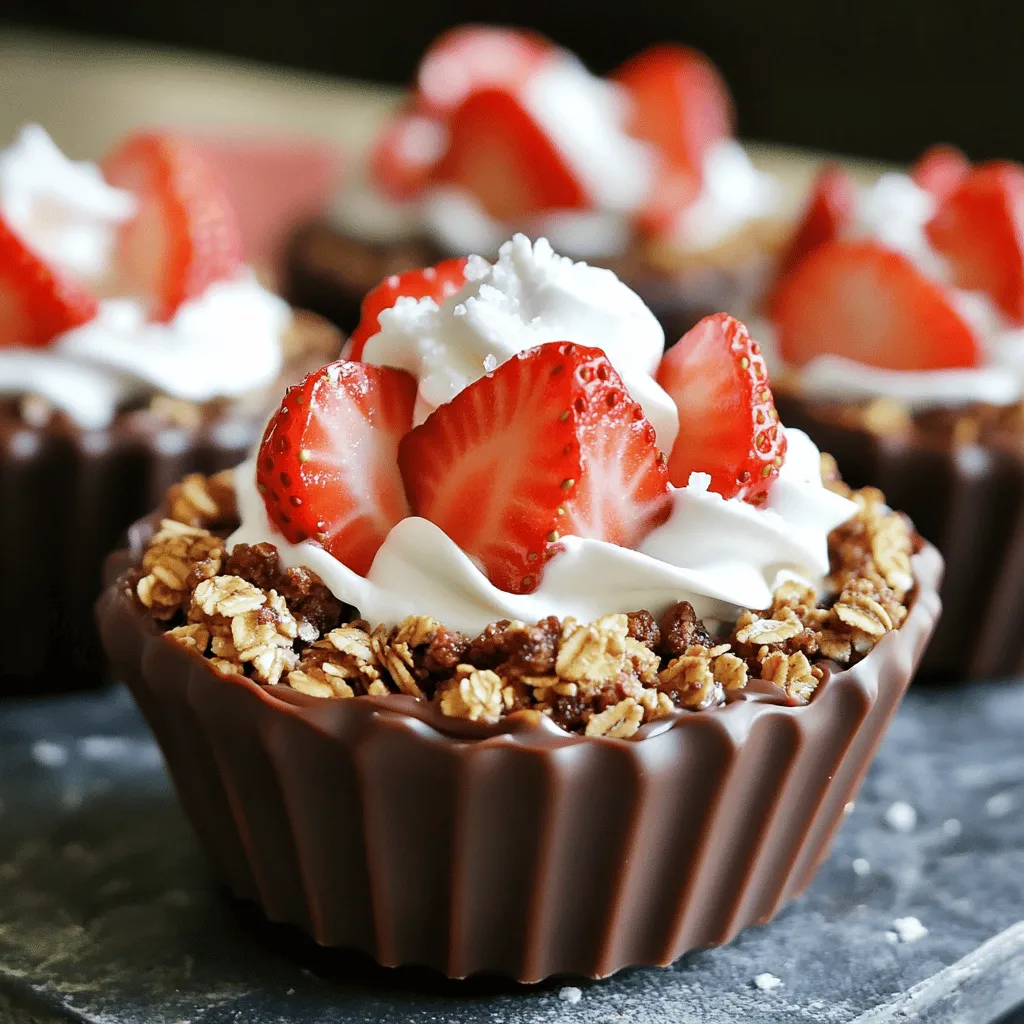
– 1 cup dark chocolate chips
– 2 cups fresh strawberries, hulled and halved
– 1 cup granola or crushed graham crackers
– 1/2 cup whipped cream or coconut cream
Optional Ingredients
– 1 teaspoon vanilla extract
– Sea salt for garnish
Kitchen Tools Needed
– Microwave-safe bowl
– Muffin cups
– Spoon for spreading and layering
Gathering these ingredients is the first step to making your chocolate covered strawberry cups.
The dark chocolate chips are key. They bring richness and deep flavor. Fresh strawberries add a bright, juicy taste. You can choose granola or crushed graham crackers for a crunchy base. The whipped cream or coconut cream gives creaminess and a light touch.
For an extra boost, a teaspoon of vanilla extract can enhance the cream flavor. If you want to play with taste, a sprinkle of sea salt can add a nice contrast.
Ensure you have the right tools. A microwave-safe bowl is a must for melting chocolate. Muffin cups help shape the chocolate into cups. And a spoon is great for spreading and layering your ingredients neatly.
With everything ready, you can start creating your delightful dessert!
Step-by-Step Instructions
Melting the Chocolate
To melt chocolate safely, use a microwave-safe bowl. Place the dark chocolate chips in the bowl. Heat them at medium power in 30-second intervals. Stir well after each interval until smooth.
Avoid overheating by watching closely. If the chocolate looks glossy and fluid, it is ready.
Preparing the Chocolate Cups
Line six muffin cups with silicone or paper liners. Spoon a generous amount of melted chocolate into each liner. Use the back of a spoon to spread the chocolate up the sides. This forms a cup shape.
Layering the Ingredients
After the chocolate sets, remove the cups from the fridge. Spoon a layer of granola or crushed graham crackers into each cup. Press down gently to create a firm base.
Now it’s time for the strawberries. Arrange the halved strawberries on top of the granola. This makes each cup colorful and inviting.
Making the Whipped Cream
In a mixing bowl, combine the whipped cream with the vanilla extract. Mix until just combined. You can spoon or pipe the creamy mixture on top. This adds an elegant touch to your dessert.
Final Assembly and Chilling
Use any remaining melted chocolate to drizzle over the whipped cream. This enhances both flavor and look. For a gourmet touch, sprinkle a tiny pinch of sea salt on each cup.
Return the cups to the fridge for another 10 minutes. This helps all the layers set together perfectly. Enjoy your delicious creation!
Tips & Tricks
Common Mistakes to Avoid
– Overheating chocolate: Always melt chocolate in short bursts. Heat it for 30 seconds, then stir. Repeat until smooth. If you overheat it, the chocolate can burn. Burnt chocolate is grainy and unusable.
– Not allowing cups to set properly: After you fill the cups with chocolate, chill them long enough. They need about 10-15 minutes to set. If you skip this step, the cups may fall apart.
Perfecting Presentation
– How to create an eye-catching dessert: Use bright and fresh strawberries on top. Arrange them in a fun pattern. Drizzle some melted chocolate on the whipped cream for a fancy look. A pinch of sea salt on top adds a nice touch too.
– Serving suggestions and plating ideas: Place your cups on a colorful platter. Add extra strawberries or a sprig of mint around them. This creates a beautiful scene and makes the dessert pop.
Substitutions and Alterations
– Alternatives for dark chocolate: You can use milk chocolate if you prefer a sweeter taste. White chocolate is another option for a creamy flavor. Just remember to adjust the melting time.
– Dairy-free options for cream: Use coconut cream instead of whipped cream. It gives a rich taste and keeps the dessert dairy-free. You can also try using a dairy-free whipped topping for a similar effect.
Variations
Fruit Alternatives
You can switch up the fruit in your cups for fun. Try using blueberries or raspberries instead of strawberries. These berries add great color and taste. You could even mix different berries for a colorful treat.
Seasonal fruit variations are also a great idea. In summer, use peaches or cherries. In fall, think about apples or pears. Each fruit brings its own flavor and texture. This keeps your dessert fresh and exciting.
Flavored Chocolate Options
You can change the chocolate you use. Using milk or white chocolate can make a sweeter cup. Milk chocolate gives a creamy taste, while white chocolate adds a nice sweetness.
Infusing flavors into the chocolate is another fun way to mix things up. You can add a dash of espresso powder for a coffee kick. Zest from an orange or a splash of peppermint extract can create a fresh twist. Just be careful not to add too much. A little goes a long way!
Healthier Alternatives
If you want to make these cups a bit lighter, consider using yogurt instead of whipped cream. Greek yogurt adds protein and a nice tang. You can also sweeten it with honey or a bit of maple syrup.
For lower sugar options, try using dark chocolate with less sugar. Look for granola that has no added sugars. This way, you still enjoy delicious flavors without all the extra sugar. These swaps help keep your dessert tasty and a bit healthier!
Storage Info
Best Practices for Storing
To keep your chocolate covered strawberry cups fresh, store them in the fridge. Place them in an airtight container. This helps prevent them from drying out. These cups will last about 3 to 5 days. After that, the strawberries may lose their texture and flavor.
Freezing Chocolate Cups
You can freeze these cups if you need to store them longer. First, place the cups in a single layer on a baking sheet. Freeze them for about 2 hours until solid. After that, wrap each cup in plastic wrap and then place them in a freezer-safe bag. When you want to enjoy them, take out a cup and thaw it in the fridge for a few hours. Serve them chilled for a refreshing treat.
Reusing Leftover Ingredients
If you have leftover chocolate, you can make chocolate drizzles for other treats. Melt it again and drizzle it over popcorn or pretzels. You can also use leftover whipped cream in coffee or on pancakes. As for extra fruit, mix halved strawberries into yogurt or salads. These ideas help reduce waste and keep your meals exciting.
FAQs
Can I use other types of chocolate?
Yes, you can use milk chocolate or white chocolate. Each type brings a unique taste. Milk chocolate adds creaminess, while white chocolate offers sweetness. Just be sure to melt them gently, like you would dark chocolate. Their melting process is similar.
How can I make these cups vegan?
To make these cups vegan, use dairy-free chocolate chips. Swap whipped cream for coconut cream. Make sure the granola is also vegan-friendly. These changes keep the dessert delicious and plant-based. Taste will stay great!
What can I serve with chocolate-covered strawberry cups?
You can serve these cups with extra strawberries or a sprig of mint. Fresh mint adds a nice touch. You might also offer a scoop of vanilla ice cream on the side. This helps balance the sweetness and adds creaminess.
Are these cups suitable for meal prep?
Yes, you can make these cups ahead of time. Just store them in the fridge. They stay fresh for about three days. For best taste, add toppings just before serving. This keeps everything looking and tasting fresh.
You learned how to make tasty chocolate-covered strawberry cups. We covered the main ingredients, kitchen tools, and step-by-step instructions. I shared tips for avoiding common mistakes and ideas for variations and storage.
These treats are fun to make and great for sharing. You can impress friends or enjoy them yourself. With simple ingredients and easy steps, you can create a delightful dessert any time. Enjoy your delicious creation!