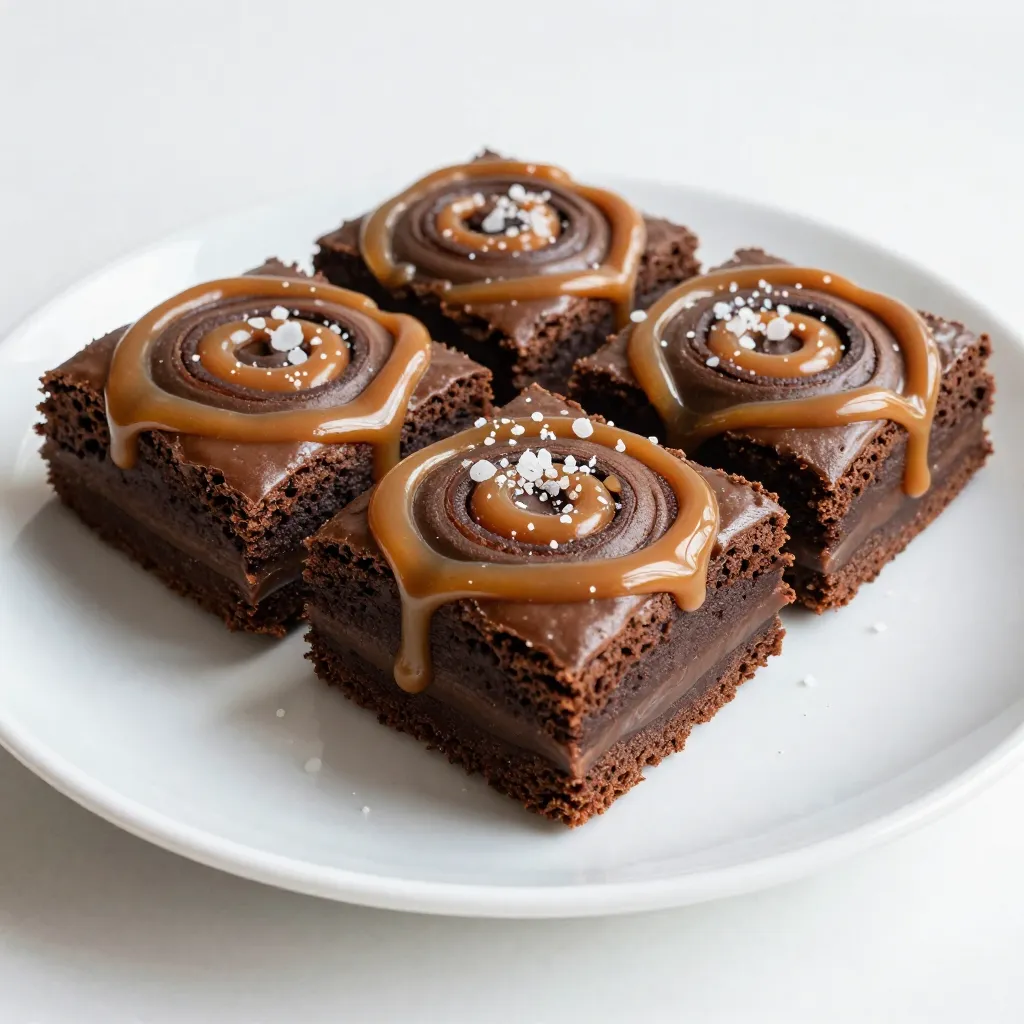
If you’re a brownie lover, you’re in for a treat! I’m sharing my easy Caramel Swirl Brownies recipe that will make your taste buds dance. With the perfect mix of gooey chocolate and rich caramel, these brownies are hard to resist. Plus, they’re simple to make, so you can whip up a batch in no time. Ready to indulge in this sweet delight? Let’s get started!
Why I Love This Recipe
- Decadent Flavor: These brownies combine rich chocolate and sweet caramel, creating an irresistible taste that satisfies any sweet tooth.
- Easy to Make: The simple steps and everyday ingredients make this recipe approachable for bakers of all skill levels.
- Perfect for Sharing: With 24 servings, these brownies are perfect for parties, potlucks, or just a cozy night in with friends.
- Customizable Delight: You can easily switch up the toppings or mix-ins, making each batch uniquely yours!
Ingredients
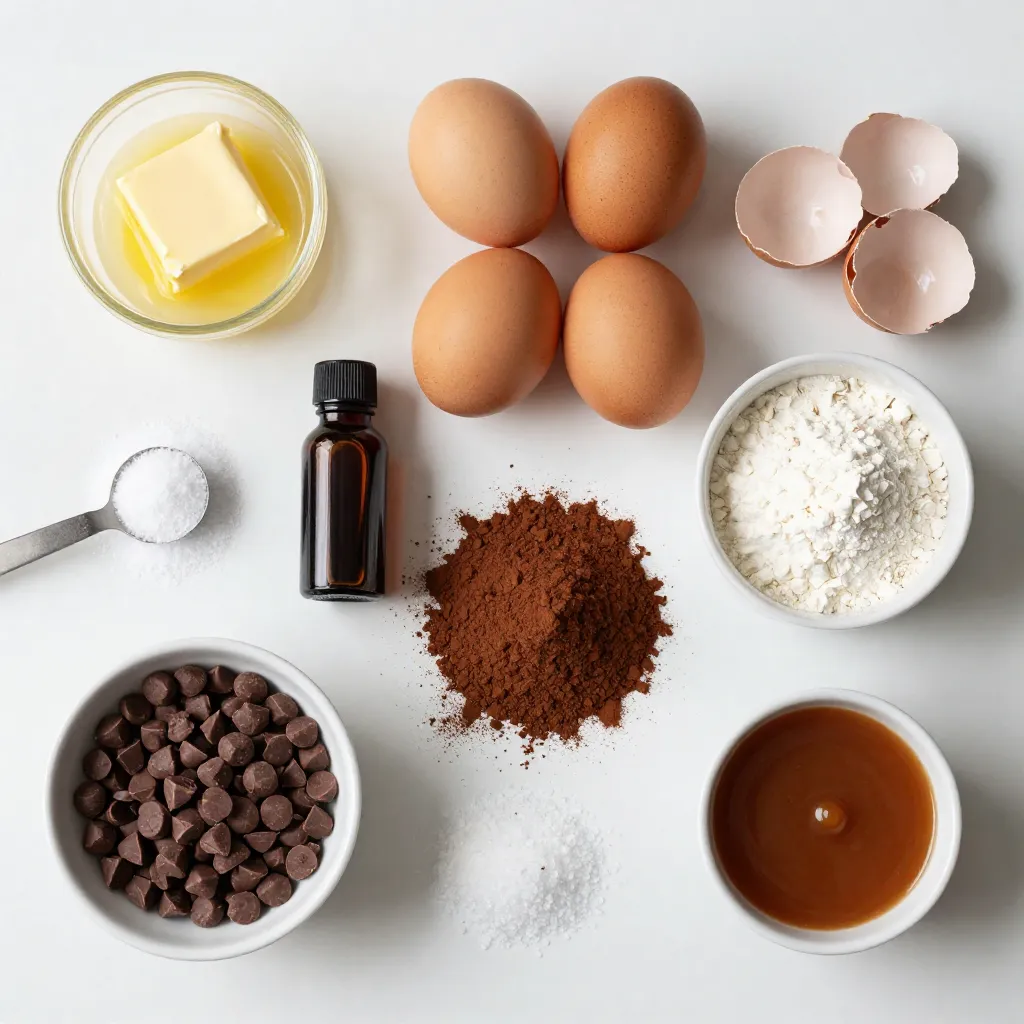
Complete List of Ingredients
– 1 cup unsalted butter, melted
– 2 cups granulated sugar
– 4 large eggs
– 1 teaspoon pure vanilla extract
– 1 cup all-purpose flour
– 1/2 cup unsweetened cocoa powder
– 1/4 teaspoon baking powder
– 1/4 teaspoon salt
– 1 cup semi-sweet chocolate chips
– 1/2 cup caramel sauce (store-bought or homemade)
You can swap unsalted butter for coconut oil if you want a lighter taste. If you need a gluten-free option, use a gluten-free all-purpose flour blend. For a dairy-free version, try a plant-based butter substitute.
Optional Garnishes
– Sea salt flakes
– Extra caramel sauce
Adding sea salt flakes on top gives a nice salty contrast to the sweet brownies. A drizzle of extra caramel sauce makes these treats even more special. It’s a great way to impress friends or family!
Step-by-Step Instructions
Preparation Phase
1. Preheat your oven to 350°F (175°C).
2. Prepare a 9×13 inch baking pan. You can grease it lightly with butter or use parchment paper. This helps with easy brownie removal.
3. In a large bowl, combine 1 cup of melted unsalted butter and 2 cups of granulated sugar. Whisk them until smooth and glossy.
Mixing Ingredients
4. Add 4 large eggs into the mixture. Do this one at a time, whisking well after each egg.
5. Stir in 1 teaspoon of pure vanilla extract for flavor.
6. In a separate bowl, sift together 1 cup of all-purpose flour, 1/2 cup of unsweetened cocoa powder, 1/4 teaspoon of baking powder, and 1/4 teaspoon of salt.
7. Gradually fold this dry mix into the wet ingredients using a spatula. Be gentle to avoid overmixing.
Assembling the Brownies
8. Gently fold in 1 cup of semi-sweet chocolate chips. Ensure they are evenly spread throughout the batter.
9. Pour half of the brownie mixture into the prepared pan. Spread it out evenly.
10. Drizzle half of the 1/2 cup of caramel sauce over the brownie batter.
11. Use a toothpick or knife to create swirls with the caramel. This gives a marbled look.
12. Carefully pour the remaining brownie batter over the caramel layer. Repeat the swirling process with the rest of the caramel sauce.
Baking and Cooling
13. Place the pan in the oven and bake for 25-30 minutes. Check with a toothpick. It should come out with a few moist crumbs, not wet batter.
14. Once baked, take the pan out and let the brownies cool for at least 15 minutes. This helps them set before you cut them.
Tips & Tricks
Perfecting the Brownie Texture
To get gooey brownies, avoid overmixing. When you fold in the dry ingredients, stop mixing as soon as you see no more flour. This keeps the batter thick and rich. For checking doneness, use a toothpick. Insert it into the center; a few moist crumbs should stick. If it comes out clean, your brownies may be overbaked.
Enhancing Flavor
For more depth, add a teaspoon of espresso powder to the batter. This little trick brings out the chocolate flavor without making it taste like coffee. Always use high-quality chocolate chips. Good chocolate makes a big difference in taste and texture.
Serving Suggestions
For special occasions, cut brownies into perfect squares and arrange them on a nice platter. Drizzle extra caramel sauce on the side for a fun dip. A sprinkle of sea salt on top not only looks nice but also boosts the flavor. Pair your brownies with a scoop of vanilla ice cream or a cup of coffee for a treat that pleases everyone.
Pro Tips
- Use Room Temperature Eggs: Make sure your eggs are at room temperature before adding them to the batter. This helps to create a smoother mixture and a better rise in your brownies.
- Don’t Overmix: When combining the dry ingredients with the wet, mix until just combined. Overmixing can lead to tough brownies, so be gentle!
- Chill Before Cutting: For clean cuts, refrigerate the brownies for about an hour before slicing. This will help the brownies set and make them easier to handle.
- Experiment with Mix-Ins: Feel free to add your favorite nuts or other chocolate varieties to the batter for extra flavor and texture. Just ensure to adjust the amount of chocolate chips accordingly.
Variations
Gluten-Free Version
You can make these brownies gluten-free. Use gluten-free flour instead of all-purpose flour. Almond flour or coconut flour works well too. Just remember to adjust the amount. Add a little more liquid if you use coconut flour. Use a gluten-free caramel sauce to keep it safe.
Nuts and Add-Ins
You can add nuts or fruits to your brownies for more fun. Chopped walnuts or pecans add a nice crunch. If you like fruit, try adding raspberries or cherries. They give a sweet and tart flavor. You can mix in some peanut butter chips or butterscotch chips for a different taste.
Different Caramel Options
You have choices for caramel in this recipe. Store-bought caramel is easy and quick. If you want to make it from scratch, it can be fun! Homemade caramel has a rich flavor and is very rewarding. You can also try flavored caramel sauces like sea salt or bourbon caramel. Each brings a unique taste to your brownies.
Storage Info
Storing Brownies
To keep your brownies fresh, store them in an airtight container. This helps prevent them from drying out. Make sure to let the brownies cool completely before sealing them. You can also separate layers with parchment paper to avoid sticking. If you want to keep them for longer, refrigerate them. This can help maintain their taste and texture.
Freezing Instructions
To freeze brownies, first, cut them into squares. Wrap each piece in plastic wrap. Then, place the wrapped brownies in a freezer bag. This will keep them fresh for up to three months. When you are ready to enjoy them, take the brownies out and let them thaw at room temperature. This will help keep the texture nice and soft. You can also warm them slightly in the microwave for a few seconds before serving. Enjoy your delicious treats anytime!
FAQs
Can I use dark chocolate instead of semi-sweet?
Yes, you can use dark chocolate. Dark chocolate will give your brownies a richer flavor. It makes them less sweet, which some people prefer. The texture might be slightly different, too, as dark chocolate has less sugar. If you like bold flavors, dark chocolate works well.
How do I achieve a fudgier brownie?
To make fudgier brownies, use less flour in your recipe. You can also add an extra egg, which helps create a moist texture. Try reducing the baking time by a few minutes. This keeps the center soft and gooey. Remember to check with a toothpick; it should come out with some moist crumbs.
What can I substitute for eggs?
If you want to make vegan brownies, there are great egg substitutes. You can use 1/4 cup of unsweetened applesauce for each egg. Another option is 1 tablespoon of ground flaxseed mixed with 2.5 tablespoons of water. Let it sit for a few minutes to thicken. Silken tofu is also a good choice. Blend it until smooth and use it in place of eggs.
These brownies are simple and fun to make. We covered the ingredients, from key measurements to substitutes. You learned how to mix, bake, and cool them for the best texture. Tips like adding espresso help boost flavor, while creative variations, like gluten-free options, allow you to adapt the recipe. With proper storage, you can enjoy these treats for longer. I hope you feel ready to create delicious brownies that impress your family and friends. Let your baking journey begi